

")
A precise measuring guide for custom horse stall fronts is the primary defense against costly project failure. One wrong dimension in an old barn with uneven floors or crooked posts can render a pre-fabricated system useless, forcing expensive re-orders and causing critical installation delays.
This guide details a zero-error process for these conditions. We explain the 3-Point Method for measuring post deviation and how to apply a 10mm tolerance, ensuring our flat-pack systems align correctly with the included 304 Stainless Steel hardware kit.

Why Do Standard Fronts Fail in Old Barns?
Standard fronts fail because they can’t handle shifting structures, uneven floors, or moisture. This warps frames, jams doors, and causes rust and rot, making them unsafe.
The Challenge of Uneven Structures and Moisture
Old barns rarely have perfectly straight walls or plumb posts. When a standard, rigid rectangular stall front is forced into a skewed opening, the frame twists under pressure. This constant structural stress eventually compromises welds and distorts the entire panel, making it a safety risk.
Persistent dampness from poor drainage is another major issue. Moisture wicks up from the ground, creating an environment where untreated wood rots quickly and unprotected steel corrodes. Once rust starts, especially at weld points on pre-galvanized tubing, structural integrity is lost.
Over time, foundations shift and concrete floors heave or sink. Even a slight change in floor level can prevent a sliding or hinged door from operating. Jammed doors are not just an inconvenience; they are a serious hazard during an emergency.
How Modern Materials Resist Barn Aging
Engineered stall systems solve these problems with better materials and manufacturing. Instead of weak, thin-walled steel, these fronts use heavy-gauge structural steel like Q235B or Q345B. This provides the necessary strength to resist warping and twisting when installed against uneven barn posts.
The most effective rust prevention is hot-dip galvanization performed *after* all cutting and welding is complete. This process seals every surface, inside and out, with a thick zinc coating that conforms to ISO 1461 standards. It creates a barrier that cheap pre-galvanized tubing simply cannot match.
Infill material choices are also critical. In damp environments, traditional pine or oak will inevitably absorb moisture and rot. Modern options directly counter this:
- UV-Stabilized HDPE: This material is completely waterproof. It will not swell, rot, or harbor mold, making it a zero-maintenance solution for wet conditions.
- High-Density Bamboo: Dense, resin-infused bamboo is naturally resistant to mold and decay, offering the look of wood without the vulnerability to moisture.

What Tools Do You Need for Precision Measuring?
You need a heavy-duty steel tape measure, a spirit level for checking surfaces, and a laser distance meter for verifying long openings and ensuring walls are square.
Core Handheld and Digital Measuring Instruments
Before ordering any pre-fabricated system, getting the site measurements right is non-negotiable. Using the wrong tools introduces errors that cause major installation headaches. Here are the essentials for the job.
- A quality steel tape measure, at least 25 feet long, is fundamental for checking widths, heights, and the dimensions of existing posts.
- Laser distance meters are invaluable for confirming long spans and shooting diagonal measurements to check if an opening is truly square.
- A long spirit level (4-foot or more) is the only reliable way to check if your existing posts are plumb and if the concrete floors are level.
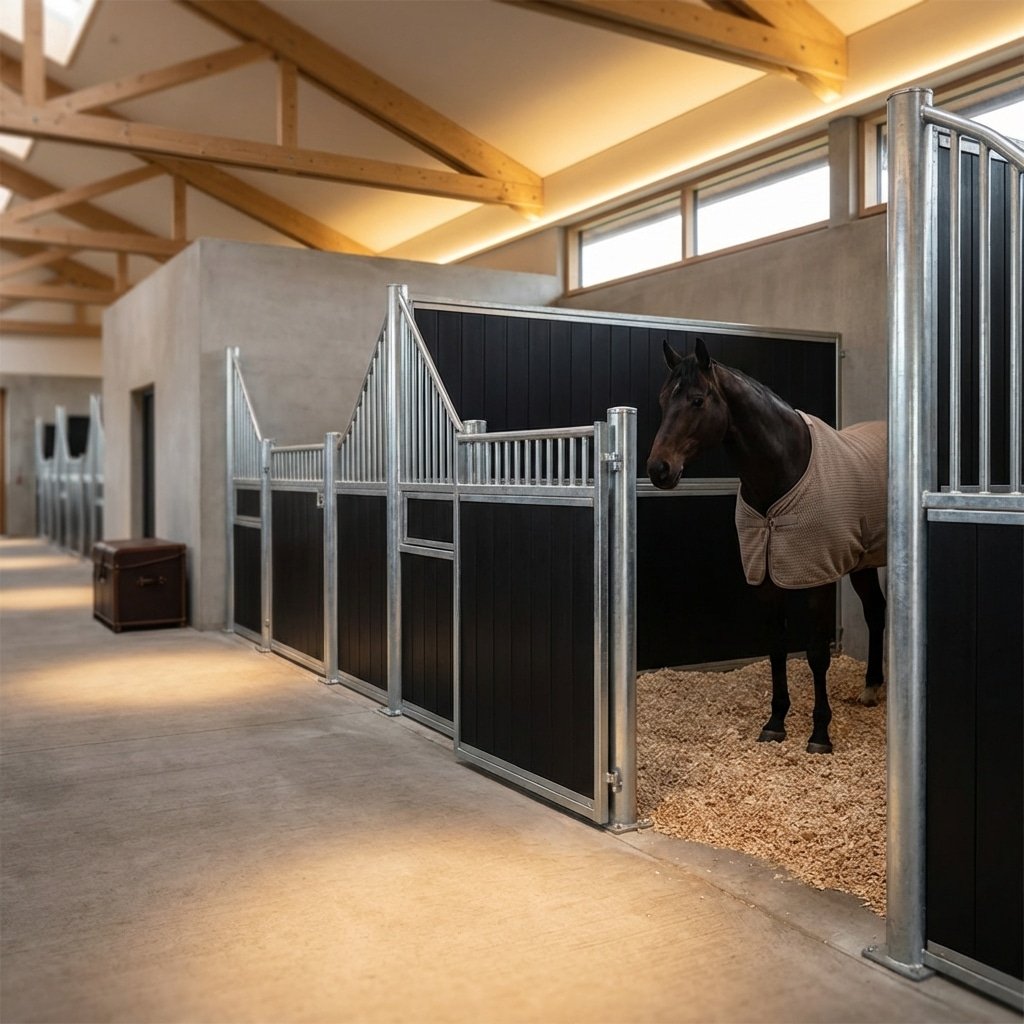
Ensuring a Perfect Fit for Flat-Pack Stall Systems
Our components are delivered in a ‘Steel Pallet Flat-Pack’ system. Every panel and post is manufactured to precise specifications at the factory. Accurate site measurements are absolutely crucial for these engineered parts to align correctly on-site.
When your measurements are correct, you guarantee the connection points for the included 304 Stainless Steel hardware kit will line up exactly as designed. This isn’t just about aesthetics; it’s about the structural integrity and safety of the final installation. There is very little room for error.
Get Custom Horse Stables Built to Last.

How to Use the “3-Point Method” for Crooked Posts?
The 3-Point Method quantifies a post’s lean by measuring its distance from a true vertical line at the top, middle, and bottom for a perfect custom fit.
Old barns rarely have perfectly straight posts. Instead of fighting this reality, you need a simple way to measure it. The “3-Point Method” is a practical technique to map out exactly how much a post leans or bows, so the stable fronts can be manufactured with the right tolerances from the start.
| Measurement Point | Purpose |
|---|---|
| Top Point | Identifies the starting deviation at the highest anchor point. |
| Middle Point | Captures the maximum bow or curve along the post’s length. |
| Bottom Point | Shows the deviation at the base, critical for floor-level alignment. |
Assessing Post Deviation with Three Key Measurements
Getting accurate data is straightforward and doesn’t require complex equipment. The goal is to compare the imperfect post against a perfectly vertical line.
- Establish a Reference Line: Use a plumb bob or a laser level to create a true vertical line next to the post face you intend to mount the stable panel to.
- Take Three Measurements: Measure the horizontal distance from your reference line to the face of the post at three points: the top, the absolute middle, and the bottom.
- Document the Variation: Write down the three numbers. The difference between them is not an error—it’s the precise data that quantifies the post’s lean or bow. For example, you might get 10mm at the top, 25mm in the middle, and 5mm at the bottom.
Applying Measurements to DB Stable’s Installation System
This measurement data is not for fixing the post; it’s for ensuring the stable system fits the reality of the barn. Our flat-pack system is engineered specifically to accommodate these common structural imperfections.
The hardware kit includes robust post connectors and high-quality 304 Stainless Steel anchor bolts designed to provide installation tolerance. Knowing the deviation in advance allows installers to plan for any necessary adjustments. The built-in adjustability in our connection points ensures the panels can be securely fastened to imperfect posts, creating a stable, rattle-free assembly without putting stress on the frame or the barn structure.

Why Must You Deduct 10mm for Installation Tolerance?
Deducting 10mm creates a necessary installation gap. This accounts for real-world barn imperfections, ensuring pre-fabricated panels can be positioned and secured without force or modification.
Accounting for Real-World Barn Imperfections
No existing barn is perfectly square. Over time, structures settle, posts shift, and floors become uneven. Attempting to fit a precisely manufactured steel panel into an imperfect opening is a recipe for failure. The 10mm tolerance is a practical buffer against the common issues found in agricultural buildings.
- Barn posts and walls are almost never perfectly plumb or square after years of use and ground settlement.
- Concrete floors often have slight slopes for drainage or contain high spots that can block a panel from sitting flush.
- Both the barn structure and the steel stable panels will expand and contract slightly with temperature changes, and the gap absorbs this movement.
Ensuring a Clean Fit for Modular Panels
Forcing a panel into a tight space damages the protective coating and can warp the frame, leading to long-term problems. The installation gap makes the entire process smoother and protects the integrity of the product. It’s not about a loose fit; it’s about a correct fit.
- The gap provides clearance to maneuver the pre-fabricated Stable Front and Partition Panels into position without scraping or damaging the galvanized finish.
- This space allows for proper alignment and fastening using the provided Hardware Kit, which includes 304 Stainless Steel anchor bolts and connectors.
- A proper fit prevents unnecessary stress on the steel framework, which ensures sliding door tracks run smoothly and the structure remains secure for years.
How to Handle Un-Level Concrete Floors?
For minor flaws, use self-leveling compounds or grind high spots. For installation, shim post bases to make the frame plumb before securing with the provided anchor bolts.
Correcting Minor Surface Imperfections
If you’re dealing with low spots or dips, applying a self-leveling compound is the most direct solution. You simply mix and pour it, and it naturally settles to create a flat, stable surface for the stall system to rest on.
For high spots, bumps, or small ridges, a concrete grinder is your best tool. Grinding down these areas removes potential trip hazards and ensures the stall’s base plates sit perfectly flat without rocking.
Ensuring a Plumb Stall Installation on an Uneven Base
Even if the concrete isn’t perfect, the stall frame must be. Place shims under the post base plates as needed to get the entire frame perfectly level and plumb. Do all your alignment work *before* drilling any holes into the floor.
Once the frame is correctly aligned, you can secure it. Use the 304 Stainless Steel anchor bolts included in the hardware kit to lock the posts into the concrete. This makes sure the structure is solid and the doors will hang and slide correctly.
Frequently Asked Questions
Should I measure the opening or the overall frame size?
You should measure the total frame size needed, which is the overall structural dimension. This ensures the stall front fits correctly within your barn’s structure. The door opening size can often be adjusted independently by the manufacturer to accommodate custom frame dimensions.
What happens if my measurements are slightly off?
Minor errors are often manageable. Most connection systems have a built-in tolerance of about +/- 1/8 inch. If your opening is up to 1 inch wider than standard, special brackets can sometimes be used. For larger differences, we adjust the panel design, not the door, to fit your space.
How large of a gap can be fixed with shims?
Gaps under 1 3/4 inches can typically be handled with standard or offset connectors and shims. For any gap exceeding 3 inches, the space must be filled in with structural material. This is a critical safety measure to prevent a horse from getting a leg trapped.
Do I need to provide photos along with my measurements?
Photos are helpful but not always required. The need for photos depends on the complexity of your project and the manufacturer’s process. Typically, detailed measurements are the most critical piece of information for creating an accurate quote and design.
Final Thoughts
Forcing standard panels into an old barn invites installation failures and rust complaints down the line. Our system is engineered for these imperfections, using ‘Hot-Dip After Fabrication’ to prevent corrosion and protect your reputation. This is how you eliminate call-backs.
Your measurements are the blueprint; now verify the materials. A trial order is the best way to test our ISO 1461 galvanization and the fit of our system firsthand. Send your project plans to our team to start a technical review and get a distributor quote.

0 Comments