


")
Why a Well-Built Shelter Matters for Your Horses
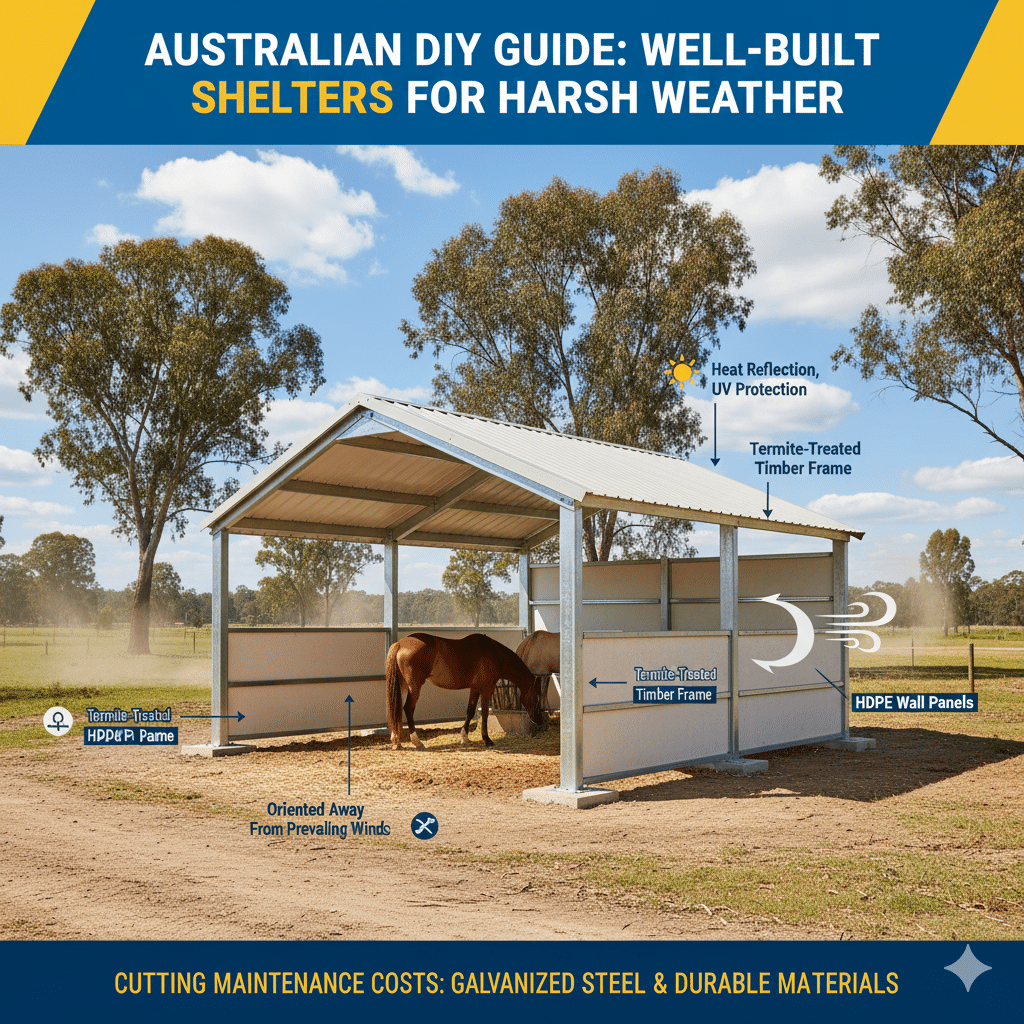
Protection From Harsh Weather
In Australia’s varied climate, a horse shelter must withstand more than rain—it needs to handle strong sun, UV exposure, and sudden storms. Start by selecting a reflective roofing option such as COLORBOND® to maintain cooler temperatures even on forty-degree days. Orientation is equally critical: position the open side away from prevailing winds to keep interiors dry and comfortable. When these factors align, horses remain calmer, eat consistently, and you avoid health issues linked to heat stress or poor ventilation.
Cutting corners during construction often results in early fatigue or corrosion, particularly in coastal or humid regions. Many failures trace back to shallow footings or untreated timber that attracts termites. Opt for steel posts or termite-treated timber set in deep concrete footings to secure lasting stability. Getting this right at the start prevents structural weakness, reduces long-term costs, and eliminates the risk of major rebuilds after storms.
Reducing Long-Term Maintenance Costs
Material selection determines how much upkeep your shelter will demand over its life. Pre-galvanized or hot-dip galvanized steel offers strong resistance to rust, which cuts down on repainting and routine maintenance. Though premium coatings like COLORBOND® carry a higher initial cost, they outperform painted steel in both longevity and surface durability under harsh sun. This translates into predictable budgeting and fewer unplanned repairs.
Composite or HDPE wall panels are also valuable when termite damage or cracking is a concern, particularly in dry inland areas. Pairing them with sound site drainage and an efficient layout can greatly extend the structure’s service life. It’s a practical example of investing slightly more upfront to avoid years of ongoing repair. When measured by total cost of ownership, durable materials and solid anchoring consistently prove the smarter financial decision.
Enhancing Horse Safety and Comfort
Every herd has its own dynamics, so the shelter should provide both openness and security. Three-sided structures are widely preferred because they resemble natural shelters, allowing horses to choose their stance and maintain social hierarchy. This freedom reduces stress and minimizes the risk of conflict or injury that can occur in confined spaces.
Adequate ventilation is equally essential. Mesh panels or partial-height openings allow constant airflow, preventing the dust and heat buildup that can trigger respiratory problems. Inside, smooth surfaces, anti-kick boards, and firm, well-drained flooring protect against cuts, bruises, and hoof conditions. When the design supports natural movement and comfort, horses stay healthier, and owners save on veterinary costs and downtime. It’s an investment that strengthens both welfare and operational efficiency.
Prerequisites: Tools and Materials Needed
Before breaking ground, gather all required materials and tools to keep the build running smoothly from start to finish. You’ll need a shovel or auger for footing holes, a tape measure and level for accurate alignment, a drill for framing work, and reliable safety gear. Prepare steel posts (100×50×2 mm), COLORBOND® roofing sheets, and fixings rated for your region’s wind load. Keep mesh panels, kickboards, and guttering on hand if you plan to add ventilation or rainwater collection. Have concrete mix ready for stable footings—or use anchor plates for modular or portable setups. For relocatable designs, pre-fabricated panels from DB Stable or a reputable local supplier save time and minimize installation errors.
Durable Horse Stables Built for Every Climate
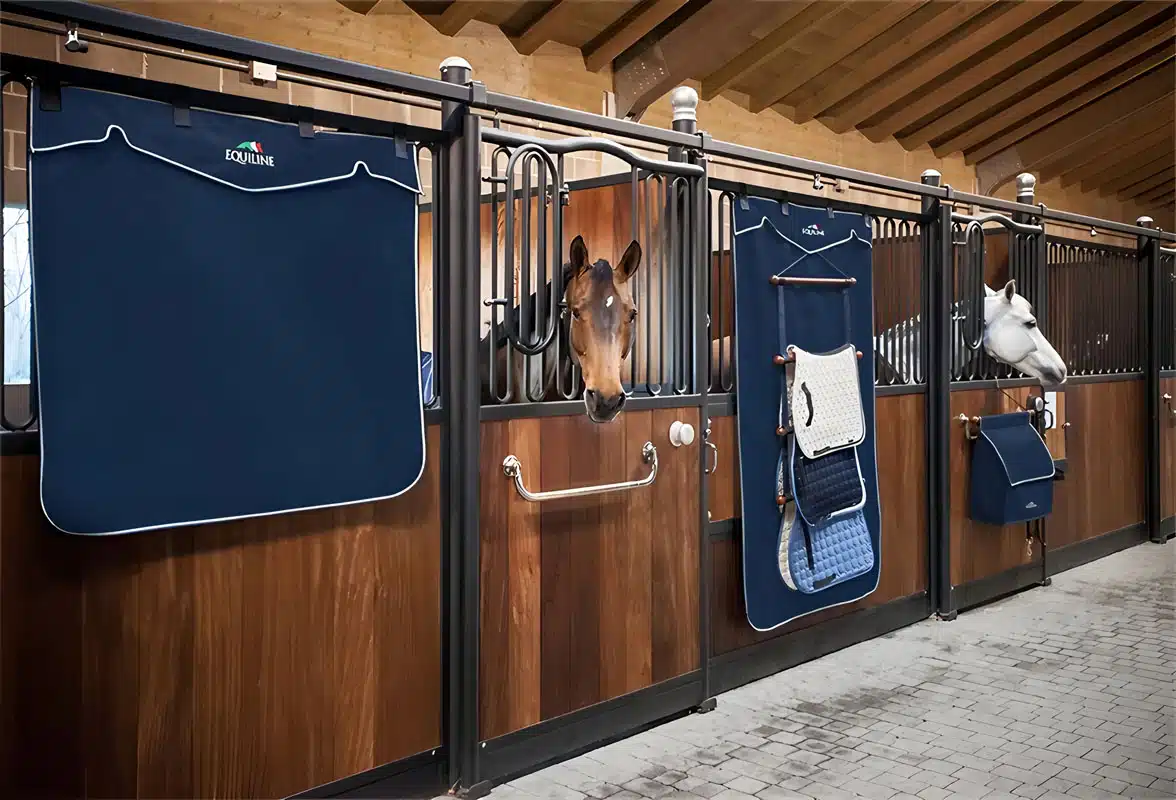
DB Stable designs equestrian buildings engineered for durability, comfort, and low maintenance. Each structure performs reliably across varied environments—from Australia’s dry interior to northern Europe’s damp winters. The modular layout allows effortless expansion or reconfiguration, whether managing a single paddock or scaling a breeding operation. Every stable combines precise engineering with premium materials to deliver long-term value while protecting horse welfare.
Step-by-Step Guide to Building a Basic Horse Shelter
Step 1: Plan the Layout and Location
Select a level site with natural drainage to prevent water pooling that can weaken footings and increase health risks for horses. Position the open side toward the morning sun to keep the area dry and away from prevailing winds that could blow in rain. Before marking the footprint with pegs and string, confirm local council regulations—some regions restrict shelter size or distance from fences. Careful planning at this stage prevents costly rework and ensures compliance for insurance coverage.
Step 2: Prepare the Site and Set Posts
Excavate post holes approximately 600–900 mm deep, adjusting for your soil type and local wind exposure. In northern or coastal areas, opt for deeper footings and cyclone-rated steel posts for added stability. Use pre-galvanized steel or termite-treated timber in termite-prone zones to extend structural life. Once posts are positioned, verify alignment with a level before pouring concrete, and allow it to cure fully. Rushing this stage often leads to uneven framing and long-term alignment issues.
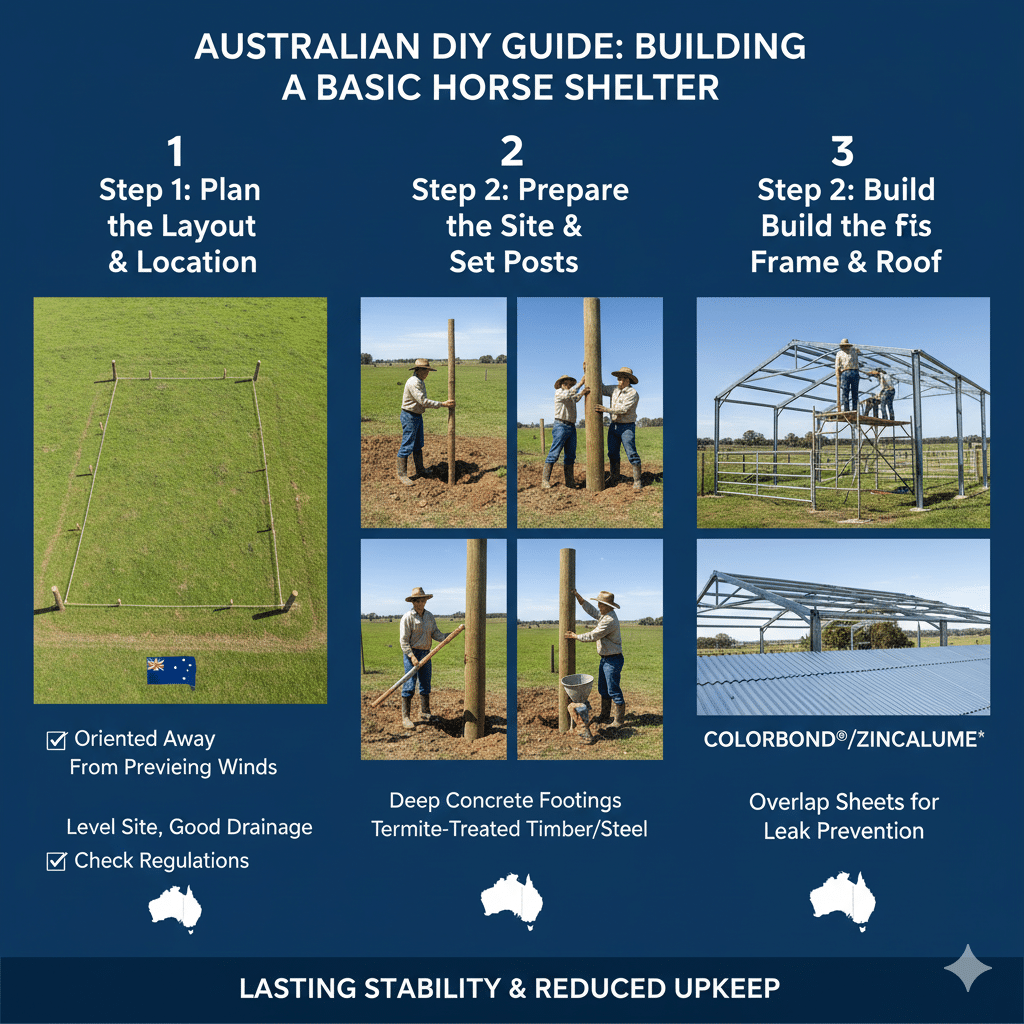
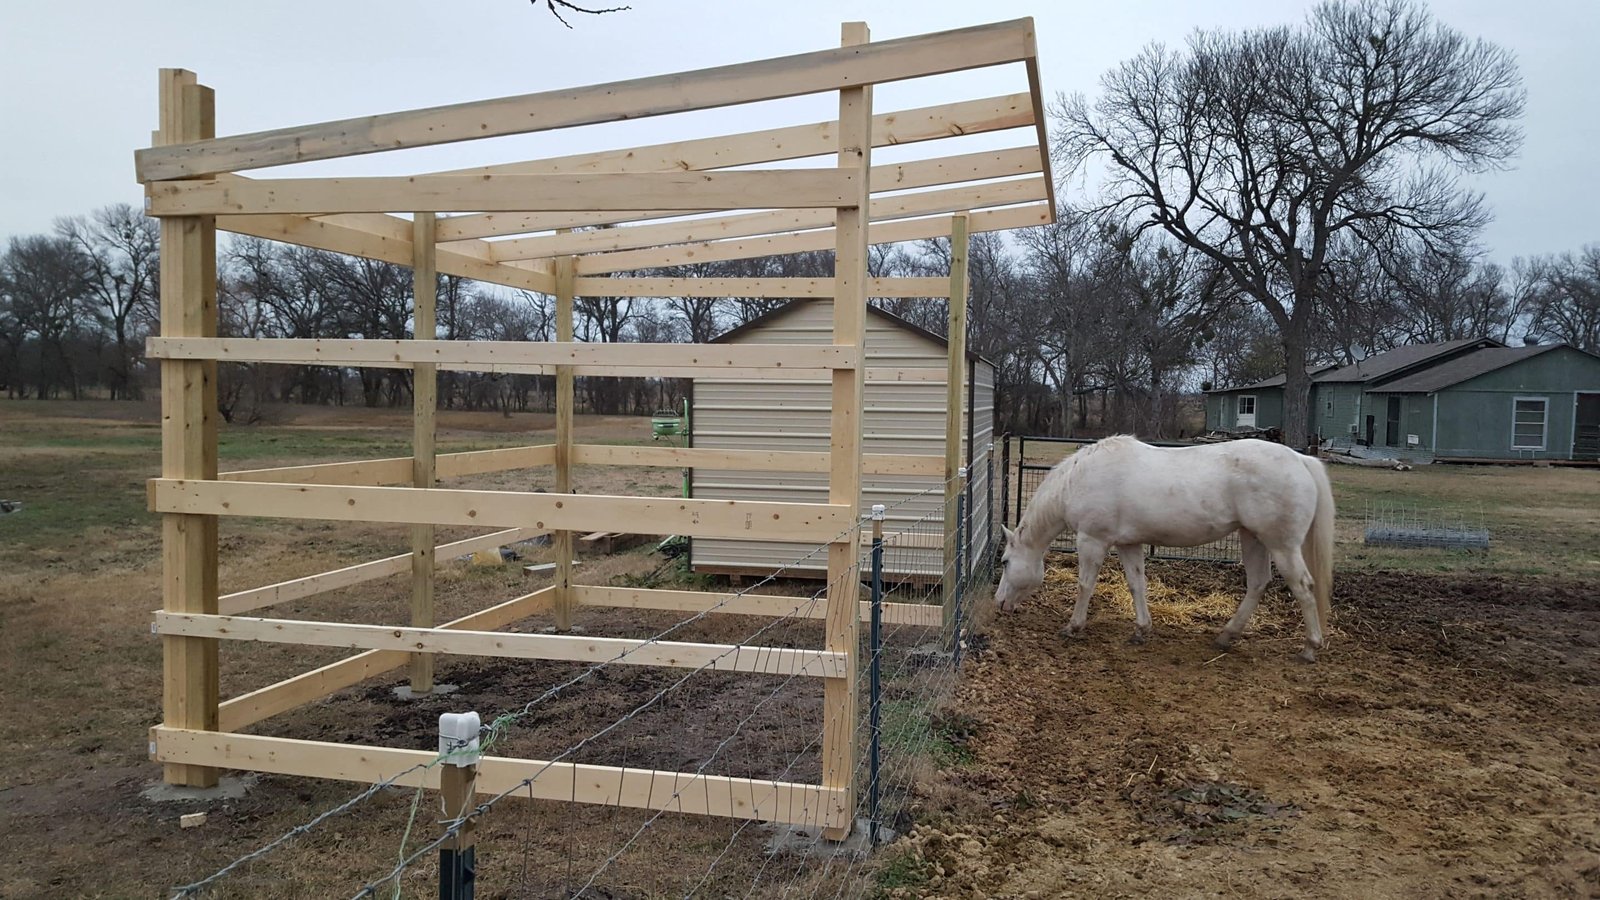
Step 3: Build the Frame and Roof
After the posts have set, install the cross beams and rafters, ensuring all components are square before tightening bolts. Choose COLORBOND® or ZINCALUME® roofing sheets for long-term corrosion resistance and performance in humid or coastal climates. Overlap sheets generously to prevent leaks and consider adding gutters if you plan to harvest rainwater. A properly aligned, sealed roof enhances comfort, longevity, and reduces ongoing maintenance.
Step 4: Add Wall Panels and Safety Features
Attach rear and side wall panels securely, leaving the front open for ventilation. Use HDPE kickboards or sealed plywood to protect interiors from hoof impact. For high-traffic shelters, include rounded trims or flexible corner guards to eliminate sharp edges. Tighten all hardware and smooth exposed edges to prevent injuries. Though these finishing touches require extra time, they significantly elevate safety and durability, aligning the build with professional stable standards.
Step 5: Inspect, Maintain, and Adapt the Shelter
Once construction is complete, check all joints for movement under load and reinforce if necessary. Apply rust-protection spray annually to joints and fasteners to prolong steel integrity. After heavy rain, confirm that surface runoff flows freely without pooling near posts. As your herd or management needs evolve, expand easily by bolting on modular panels or stable fronts instead of rebuilding. Regular inspections and proactive maintenance extend the shelter’s lifespan, ensuring both horse safety and asset protection.
Expert Tips and Common Mistakes
Pro Builder Tips
Begin by organizing all materials before assembly to avoid unnecessary delays. Pre-cutting and labeling each steel component keeps on-site work efficient and accurate, particularly for multi-module builds. Once on-site, dry-fit the panels to confirm alignment before tightening bolts—minor adjustments early prevent costly rework later. When anchoring, use bolts or base plates that connect directly to reinforced footings; relying only on concrete friction increases the risk of movement in strong winds. Finally, include narrow roof-edge ventilation gaps. This small detail significantly improves comfort by releasing trapped heat during peak summer.
Avoid These Common Mistakes
Seemingly small oversights can quickly escalate into expensive repairs. Neglecting termite treatment in timber posts leads to early deterioration, particularly in humid regions. Poor alignment with prevailing winds allows rain into stalls, creating wet footing and higher upkeep. Using undersized posts can cause flexing or failure under wind pressure, and inadequate drainage weakens foundations while promoting hoof disease. Addressing these fundamentals—treated timber, deeper footings, correct wind orientation, and proper grading—during construction prevents far greater costs, downtime, and safety risks later on.
Alternatives: Prefabricated and Modular Shelter Kits
Many buyers want durability but can’t afford the downtime of custom construction. Prefabricated and modular kits offer a practical middle ground—quick to install, engineered for Australian conditions, and adaptable for future expansion. The right choice depends on herd mobility, regional wind exposure, and how long you intend the structure to remain in place.
Pre-Galvanized Steel Frame Kits
For long-term installations requiring strength and reliability, pre-galvanized steel kits from brands like Tru-Bilt and Jimmy’s Metal Fab are a proven solution. Each kit arrives pre-engineered and pre-drilled, cutting assembly time significantly while meeting Australian wind rating standards. The galvanized frame prevents corrosion, and roofing options in COLORBOND® or ZINCALUME® manage heat effectively while blending with existing buildings. Optional additions such as day yards or stable fronts make it easy to scale as operations grow.
Lightweight Fabric-Cover Shelters
When portability or temporary deployment is the priority—such as event setups, leased paddocks, or seasonal use—fabric-covered models deliver flexibility. UV-stabilized materials like LandmarkTS2C™ perform well under strong sun and can be installed or moved in a single day. These shelters are cost-efficient but require periodic checks for fabric wear and anchor tension. For breeders or contractors managing multiple sites, they provide a practical short-term solution that travels easily.
Imported Modular Systems from DB Stable
DB Stable offers modular systems designed for maximum adaptability and service life. Their hot-dip galvanized frames combined with UV-resistant HDPE boards resist corrosion, impact, and UV degradation far better than untreated materials. Panels can be rearranged, replaced, or relocated as facility needs evolve—ideal for expanding or rented equestrian properties. Clients consistently note their excellent durability-to-cost ratio, with panels staying weather-tight and rust-free through years of intensive use.
Frequently Asked Questions
Do I need council approval to build a horse shelter in Australia?
Most councils require building permits based on your shelter’s size, height, and location. Check your local guidelines before purchasing materials, as requirements differ by region. Confirming compliance early helps avoid redesigns, added costs, and project delays.
What roofing performs best in Australian climates?
COLORBOND® steel is a proven choice for Australia’s demanding weather. Its UV-resistant coating prevents corrosion and fading, maintaining both appearance and structural protection with minimal maintenance—an advantage for long-term cost control.
How deep should I set the posts?
Posts should be embedded at least 600 mm deep for most sites and deeper in sandy soils or high-wind areas. Greater depth improves load resistance and safeguards the structure during severe weather, particularly in cyclone-prone regions.
How should I orient a paddock shelter for best protection?
Position the open front toward the east or north-east to capture morning light and shield against prevailing winds from the west or south. This configuration keeps interiors drier, retains warmth in winter, and limits dampness on cold mornings.
Can modular panels make expansion easier?
Yes. Modular shelters are engineered for quick expansion using bolt-on wall or roof panels. This flexibility allows you to scale facilities as your herd grows without dismantling existing structures or disrupting paddock layouts.
Final Thoughts
A well-built horse shelter is more than just a structure—it’s a long-term safeguard for your horses’ welfare and your investment. When constructed with quality steel or treated timber and securely anchored, it can withstand years of heat, wind, and storms with minimal upkeep. That reliability reduces maintenance time and ensures a consistently safe environment for your animals.
Maintain your shelter by keeping the site clean, inspecting fixings after each season, and addressing wear before it escalates. Once your base structure is set, consider adding functional zones—such as a feed room, wash bay, or storage area—to streamline daily operations and support efficient care year-round.

0 Comments