


")
Drainage Essentials for Stable Floors
Plan effective drainage at the outset of any stable project to keep stalls dry, protect flooring integrity, and control long-term maintenance costs. Ignoring these details drives up repair budgets, increases disease risk, and shortens floor lifespan. Integrate proven drainage methods into flooring selection, subfloor composition, slope design, and site layout for consistent performance.
Types of Stable Flooring Drainage Systems
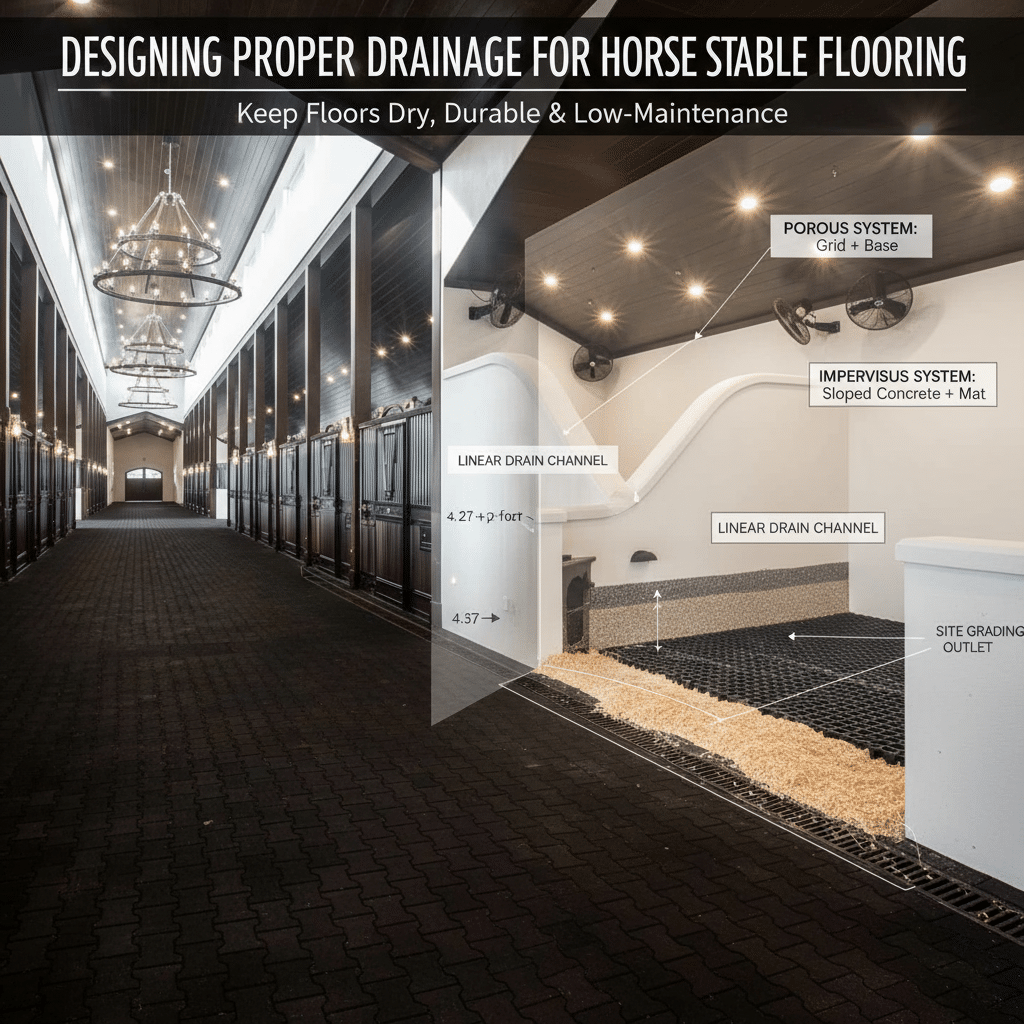
Choose porous or impervious flooring based on climate, soil drainage, and service capacity. Porous designs with sand, gravel, or grids filter liquids into the soil, minimizing stall moisture in well-drained locations, though they require periodic material top-up. Impervious surfaces such as concrete or asphalt block penetration and must be sloped toward channels or gutters; correct installation and sealed joints ensure durability and hygiene in high-use facilities.

Subfloor Construction and Site Preparation
Remove all organic matter and compact the subsoil before adding base layers to prevent settling and cracks. Install graded gravel topped with coarse sand to form a stable, load-bearing bed that allows water flow. Raise foundations by at least 12 inches in wet or level areas to prevent storm or runoff infiltration, and maintain consistent elevation in large builds to support uniform wear and align drainage connections.
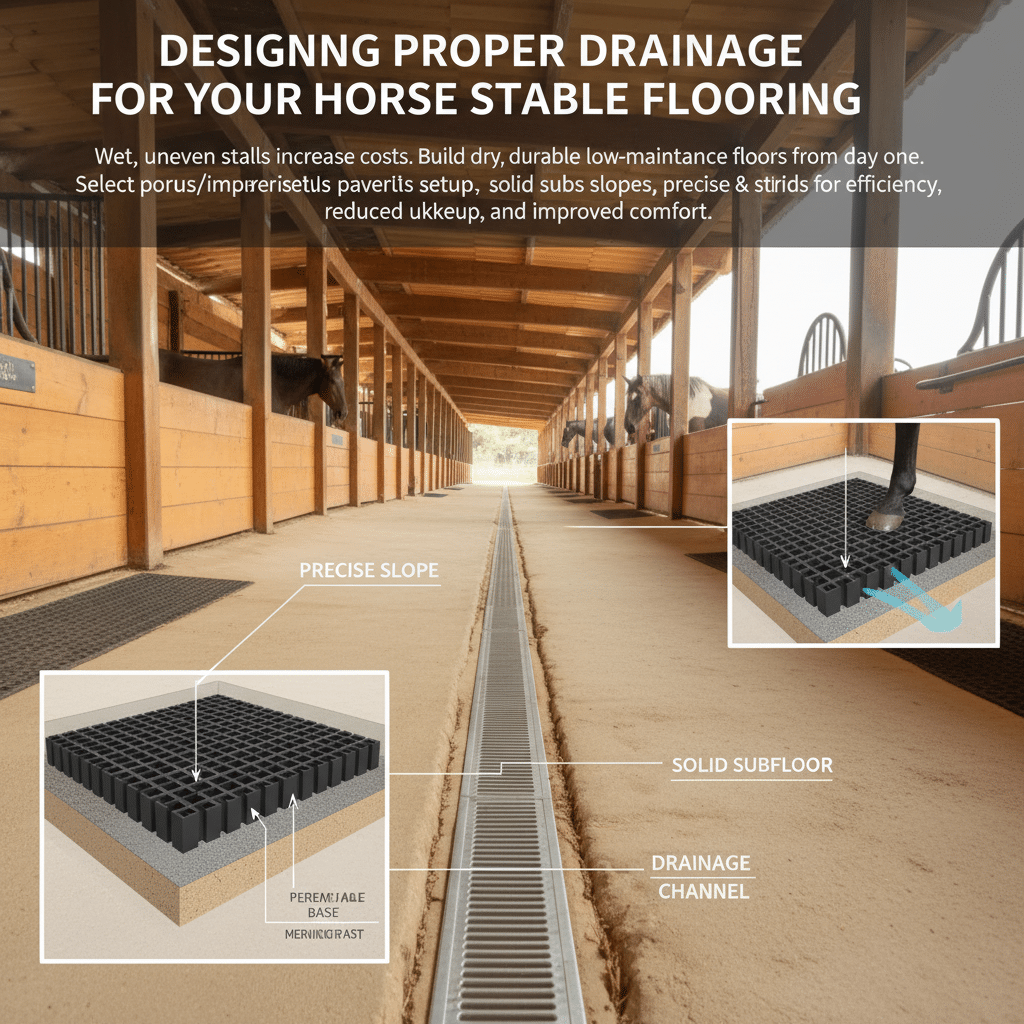
Floor Slope and Drainage Channels
Shape floors to drop about 1 inch every 5 feet (1.5–2%) toward drainage points, ensuring smooth runoff without stressing horses. In shared aisles, direct grade into side channels to keep wastewater out of high-traffic zones. Place channels or trenches with gravel infill or metal grates along walls for efficient cleaning, and avoid interior stall drains that block quickly with bedding; instead locate channels where fluids naturally exit during mucking.
Advanced Drainage Solutions and Site Grading
In high-water table zones, add subsurface drainage—drain rock beds, perforated pipe, or modular grids—to keep floors dry from below, reducing frost heave and bacterial buildup. Grade surrounding ground to divert rain and wash water away from all stable edges. Use swales, French drains, or elevated pads for peak water events, and pair stall surfaces such as perforated mats or sand-clay mixes with disciplined bedding upkeep to prolong drainage performance and protect livestock comfort year-round.
Popular Flooring Drainage Systems
Selecting an effective drainage system for écurie de chevaux floors is a strategic decision—it impacts animal health, reduces long-term upkeep, and safeguards operating efficiency. Based on our work across diverse climates, performance depends entirely on correct installation and alignment with site realities. The right choice delivers consistent results only when matched to local soil conditions, climate, and the daily workload of the facility.
Porous Flooring Systems
Layered materials such as sand, gravel, or crushed stone allow liquids to drain into the ground rather than collect on the surface, reducing moisture and ammonia odor in stalls. These systems excel where soil naturally supports drainage; in heavy clay or high-water zones, supplemental sub-drains are essential. Precise grading and a filter fabric layer prevent clogging from fine bedding or manure, ensuring long-term performance.
Impervious Flooring with Surface Drainage
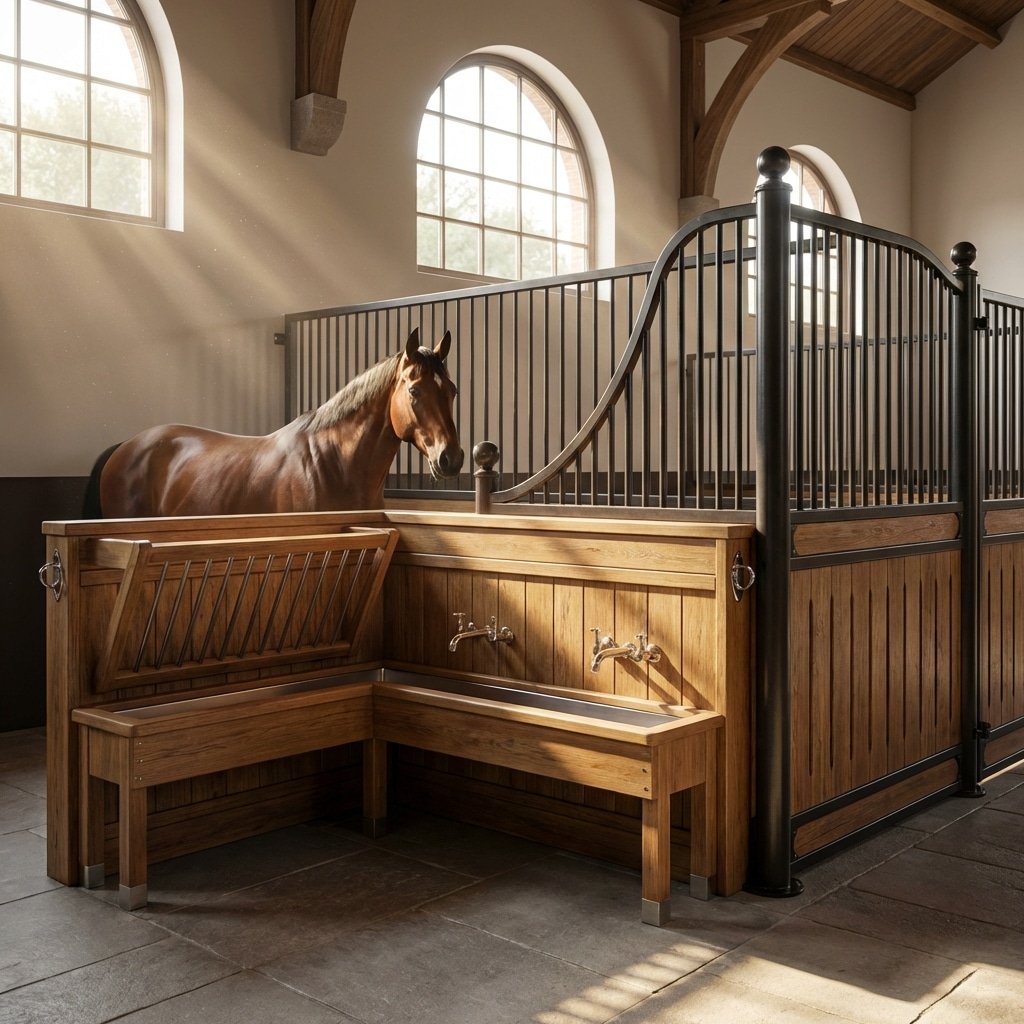
Concrete or rubber mat surfaces require a built-in slope to guide liquids to side channels or gutters, ideally at 1 inch per 5 feet. Channels with protective grates move wastewater efficiently and simplify washing down stalls. Position them along walls or aisles to keep horses off drain lines. This configuration minimizes puddles, speeds cleaning, and delivers predictable flow without creating slip risks.
Specialized Stall Drainage Products
Stall grid systems operate like a French drain beneath mats, transporting liquids away, reducing ammonia, and cutting bedding use—valuable where disposal costs are significant or conservation matters. Perforated mats combine drainage and traction, maintaining hoof stability during wet conditions from misting or washdowns. Selection should consider cleaning frequency, waste handling strategy, and risks of freezing or clogging for your location.
Design Considerations for Effective Drainage
Elevate stall floors above surrounding grade to block rain or runoff, and use gentle interior slopes to direct liquids toward channels or trenches. Gravel-filled or open channels along walls move waste quickly and resist clogging if sized appropriately. Match drainage infrastructure to soil type, freeze exposure, and maintenance capacity, balancing performance with cost to create a system that operates reliably year after year.
Étapes de l'installation
Installing écurie de chevaux flooring drainage requires a disciplined process to ensure effective water control and a safe, hygienic environment for horses. Each stage builds on the last, and early errors are costly to correct. Follow the steps in order to maintain planned slopes, direct water to designated exit points, and keep maintenance straightforward.
Site Evaluation
Walk the site in both wet and dry conditions to assess soil drainage and identify natural slopes that can work for or against your plan. Locate and address external water sources—such as roof leaks or uphill runoff—before proceeding, otherwise the system will be overloaded. Correcting site weaknesses at this stage prevents costly retrofitting after installation.

Excavation and Preparation
Mark drainage channels clearly so the excavation matches your design, and confirm utility locations before digging to avoid damage. Cut trenches with a slope of about 1% (1 cm drop per meter) to direct water toward exit points. Line them with filter fabric to keep fine soil from clogging the layers, then compact clean gravel to promote fast flow and long-term stability ahead of pipe installation.
Drainage System Installation
Position perforated PVC or flexible pipes inside the trenches, fully encased in gravel for all-direction water intake. Add gravel until the trench is level with the surrounding ground. In areas prone to splash or spill, install catch basins or open channels so water drains quickly. Keep stall floors sloped about 1 inch over 5 feet to guide runoff without overstraining horses.
Flooring Material Installation
Create a solid base from well-compacted gravel, sand, or limestone to support mats and drainage. Install rubber mats across the main floor, leaving critical drainage channels uncovered for direct flow. Design mats to be easily lifted for routine inspections, preventing trapped water that can cause odor or hygiene issues.
Maintenance Best Practices
Preserve slopes and keep grates secured over open channels. Inspect trenches and basins regularly to remove sediment before buildup. At set intervals, lift sections of mats to check base layers for pooling or blockages. These measures extend system life and maintain a clean, safe environment year-round.
Des écuries durables pour tous les climats
DB Stable crafts high-quality, customizable écuries conçues to withstand extreme weather worldwide. From insulated panels to rust-resistant cadres en acier, each stable ensures safety, comfort, and compliance with global standards.
Maintenance and Common Issues
Maintaining peak performance in stable flooring drainage systems demands a structured, proactive plan. Across projects in Australia and New Zealand, we see that consistent inspections, rapid response to developing issues, and sound design decisions directly prevent costly repairs and protect equine health. Below are priority actions and recurring challenges that builders and owners should address from day one.
Regular Inspection and Cleaning
Conduct scheduled inspections for flooring materials, bedding depth, and all drainage channels. Identify clogging, pooling, or odor early to act before damage spreads. Porous floors such as sand or gravel compact under heavy use; plan periodic deep cleaning to remove manure and bedding waste, keeping drainage clear. Even impervious surfaces can suffer from debris buildup or ice formation—check and clear them before winter to maintain flow and safety.
Common Drainage Problems
Blocked drains, especially in below-ground runs, cause rapid water pooling and odor. Uneven or settling floors create puddles that compromise hygiene and increase slip hazards. Excess bedding waste clogs channels and elevates ammonia levels, risking respiratory health. Inspect and maintain drain cover finishes—avoid gaps wide enough to trap a hoof.
Site and Design Considerations to Avoid Issues
High groundwater or poor grading can lead to chronic dampness. Mitigate with sub-drainage such as French drains or gravel layers beneath flooring to move moisture out. Build in a floor slope of about 1 inch per 5 feet to direct liquid to drains without stressing joints or hooves. Select materials that combine strong drainage capacity, durability, and ease of cleaning to minimize ongoing maintenance.
Maintenance Protocols for Stable Health
Implement a formal maintenance calendar focused on prompt clearing of blocked drains and routine waste removal from high-traffic zones. Keep bedding depth controlled to maintain drier conditions and suppress ammonia production. Monitor drainage performance through seasonal changes to identify and correct issues early, extending flooring life and ensuring a consistently safe, dry environment for horses.
Cost and Efficiency Tips
Builders and DIY stable owners must balance upfront savings against ongoing coûts de maintenance. Design horse stable flooring drainage systems to deliver consistent performance for years with minimal repairs by making informed decisions on materials, layout, and installation from day one.
Balancing Initial Investment and Long-Term Savings
Prioritize materials with high durability, strong water permeability, and low servicing needs. Investing slightly more in robust solutions such as geocell products like BaseCore can extend system life by 40–60%, preventing costly reinstallations. This reduces downtime, safeguards horse health, and avoids expenses that can exceed $5,000 annually from surface replacements, veterinary care, and equipment work linked to poor drainage.
Efficient Drainage Design Practices
Set a gentle slope of about 1 inch per 5 feet toward channels or gravel trenches to prevent pooling and keep bedding dry. Integrate geocell grids, geotextile fabrics, and interlocking panels to accelerate water movement and cut maintenance. Use laser grading for precision; while DIY may seem cheaper, professional installation often delivers more reliable outcomes and avoids expensive failures later.
Maintenance Strategies to Control Long-Term Costs
Address minor drainage issues promptly to prevent full system replacements. Clearing blockages or regrading early safeguards the setup, reduces slip risks, and protects valuable equipment. Selecting resilient components such as UV-resistant HDPE panels and hot-dip galvanized steel frames ensures structural longevity, minimizes replacements, and limits operational disruption.

FAQs About Stable Flooring Drainage
Effective drainage in horse stalls directly impacts animal health, odor control, and operating costs. When selecting flooring, prioritize systems that move water and waste away rapidly, protect structural components, and keep bedding dry. Based on extensive field experience with durable stabling solutions, these responses focus on proven drainage strategies for daily stable management.
Why is drainage so important in a horse stall?
Poor drainage leaves stalls damp, creating mud and bacterial growth that lead to hoof problems such as thrush. Accumulated urine generates ammonia fumes that harm qualité de l'air and respiratory health. Keeping the base dry mitigates these risks, protects floors and foundations, and lowers long-term repair costs.
What is the best base material for good drainage?
Use crushed stone or gravel for reliable drainage, as they let water pass through quickly. Limestone screenings or well-compacted sand are alternatives if they remain porous yet stable. Always ensure the base is compact enough to support flooring while maintaining pathways for water to exit efficiently.
How do interlocking stall grid systems work?
Interlocking grids elevate the floor, keeping horses above residual moisture. Liquids drain through the openings into the sub-base, which keeps bedding cleaner and limits muck buildup. This approach accelerates cleaning and sustains a dry, sanitary environment without major construction.
Should I install drains inside the stalls?
Internal drains can improve waste removal but must be positioned to avoid tripping hazards and ensure constant outflow. Evaluate whether your climate and stall use cause persistent wetness, and confirm you can maintain drains on schedule. Placement and upkeep will determine whether they enhance hygiene or create additional maintenance demands.
How can I improve drainage in an existing stable?
Begin by adjusting floor slope so liquids run away from stall entrances. Replace dense, non-porous base layers with crushed stone or similar materials to boost subsurface flow. Add perimeter drains and grade surrounding land to prevent external water ingress. Where full renovation is impractical, use grids or mats to elevate bedding above moisture.
Final Considerations for Reliable Stable Drainage
Effective drainage in a horse stable begins with a compacted, well-graded gravel and sand base, set to the correct slope to keep water moving away from high-traffic areas. Select drainage materials—porous aggregates or solid surfaces with channels—based on soil type and climate to ensure lasting performance.
Inspect and clear channels regularly, maintain bedding depth, and address any floor settlement early to avoid costly repairs and health risks. For long-term durability and hygiene with reduced upkeep, combine solid subfloor preparation with stall grids or geocell panels to create a stable that stays dry, safe, and efficient throughout the year.


0 commentaires